Thursday, September 30, 2010

Chili Sauce

Per tradition we always do peaches.  They are a family favorite, we have an ample supply because of Grandma's fruit trees and they are the most YUMMY.  But also every year we try and do a tomato based sum'in sum'in.  Stewed tomatoes, Spaghetti sauce, Salsa... 
This year is was Chili Sauce.

We got the recipe by one of Dad's old buddies Greg Amidan
Chili Sauce

6  Lg Onions
4  green Bell Peppers
2  red Bell Peppers
20  large Tomatoes
1/4 cup McCormick Pickling Spice ground finely in blender
1  cup Cider Vinegar
1  cup sugar
2 Tbsp  Salt
1  tsp white pepper

Scald and peel tomatoes and pulse in food processor 5-6 pulses
Peel and quarter onions and pulse in food processor about 10 pulses.

Quarter and seed peppers and pulse in food processor about 10 pulses.
Place all veggies and pickling spices in a large stainless steel stock pot bring to a boil  stirring every 10 minutes.
Boil exactly one hour continue stirring every 10 minutes.

Add vinegar, sugar, salt and pepper stir well and boil for another hour or until thickened.
Put into hot sterile jars, wipe rim with clean wet cloth, and add sterile flats and put rings on as tightly as you can.

Process in cold pack canner for 45 min for quarts 35 min for pints.  

Enjoy on cream cheese with crackers, or with tortilla chips or use as an ingredient in sweet chili or over a crock pot roast.  ENJOY.
We didn't double the recipe but we did do 4 batches of it at one time - yeah baby!
We ended up with something like 7 quarts, 25 pints and about 6 half pints.
all things averaged out I would guess each batch does about 10 pint jars...

Pickled Peppers


Set out sterile jars, flats and rings.

Fill canner with a several inches of water and start warming.

In a sauce pan warm up a ratio of 2 cups of water, 1 cup of vinegar, 1 Tbsp salt' and 1/2 tsp of dill weed. bring to a boil.

Wash peppers (I used an assortment of hot peppers.) shoot no picture of the sack of before.

PUT ON PLASTIC GLOVES.

Slice peppers and put into jars.

Pour in pickled water. top with flat, ring and tighten.

Put in canner and cover with enough water to come over lid about an inch.

Process 25 min for half pints, 35 min for pints 45 min for quarts.

Enjoy on sloppy joes, chili, sandwiches, nachos, anything that needs a slight kick.

Saturday, September 25, 2010

Canned Peaches

This year, we've had fun picking and canning 12 jars of tomatoes, 12 jars of grape juice and 49 jars of peaches. Apples from my old house are next, and hopefully some peach jam and chili sauce.
Mom's going to write step by step instructions I can put on here so we'll always have it, RIGHT MOM?

1. Pick the peaches at Grandpa Porter's house
2. Blanch the peaches in boiling water and peel the skins off
3. Sneak a few bites--warm fresh peaches are YUMMY
4. Fill the jars to the top with sliced peaches, then fill with sugar water (mom, how much sugar to water and fruit fresh)?? She responded fast...
light syrup is 1 cup of sugar to 8 cups of water and a couple tablespoons of fruit fresh. bring to a boil to dissolve sugar.  This is approximately how much you need for 7 quarts of peaches. so we double, triple, or quadruple according to our needs.
5. Wipe the tops of jars clean and put a sterilized new lid on top. Soak the lids in boiling water for a minute or two. Put the ring on as tight as you can.
6. Boil the jars completely covered in water in a canner for 30 minutes
7. Take the jars out straight up out of the water (do not tip like my mom is doing here :) LOL and place on a towel until the POP!!
Ah, don't they look great!! Enjoy all winter long
Tomatoes    cover with boiling water to slip the skins.  shove into jars up to the neck. add a tsp of salt and a tsp of vinegar. wipe of jar, add sterile lid and tighten the ring. bring to boil in canner. boil for 45 to 50 minutes. tada

Grape juice.   fill juicer with cleaned grapes. no need to stem. Steam for an hour.  pour out into sterilized jars and top with sterile lid and tighten the ting. listen for the fun pinging sound. tada.
to serve. pour into pitcher and add a bottle of 7up type soda. regular or sugar free. enjoy.

Tuesday, August 10, 2010

Banana split breakfast

Needless to say, your kids will eat it.

All it is is a banana cut in half and spread with peanut butter and put back together. I topped it with Light and Creamy Yoplait yogurt so it was thick enough to look like ice cream. Then I drizzled it with a bit of chocolate syrup. The kids ate it up. I would have put nuts on mine. YUM!!

My son eats and sleeps with his trains. Literally.


Tuesday, August 03, 2010

Pretzels

A while ago, I was craving those nice, big pretzels you get at the mall or Sam's Club (or wherever....). I went through a dozen different recipes and this one looked the easiest. :) We all know that I am all about easy! :D I just have to say, though, I got the recipe from here, and my pretzels didn't look anything like those. But they tasted great!

Ingredients
  • 1 (.25 ounce) package active dry yeast
  • 2 tablespoons brown sugar
  • 1 1/8 teaspoons salt
  • 1 1/2 cups warm water (110 degrees F/45 degrees C)
  • 3 cups all-purpose flour
  • 1 cup bread flour (I didn't have that, so I just used regular flour-and they still turned out fine)
  • 2 cups warm water (110 degrees F/45 degrees C)
  • 2 tablespoons baking soda
  • 2 tablespoons butter, melted
  • 2 tablespoons coarse kosher salt

Directions

  1. In a large mixing bowl, dissolve the yeast, brown sugar and salt in 1 1/2 cups warm water. Stir in flour, and knead dough on a floured surface until smooth and elastic, about 8 minutes. (Or, if you are impatient like me, feel proud of yourself if you last 3 or 4 minutes.) Place in a greased bowl, and turn to coat the surface. Cover, and let rise for one hour.
  2. Combine 2 cups warm water and baking soda in an 8 inch square pan.
  3. After dough has risen, cut into 12 pieces. Roll each piece into a 3 foot rope, pencil thin or thinner. Twist into a pretzel shape, and dip into the baking soda solution. Place on parchment covered cookie sheets, and let rise 15 to 20 minutes.
  4. Bake at 450 degrees F for 8 to 10 minutes, or until golden brown. Brush with melted butter, and sprinkle with coarse salt, garlic salt or cinnamon sugar.


As a side note, I have to say that I did NOT follow the directions to roll each piece into a 3 foot rope. I just kind of rolled them out until they seemed fine to me, and they were not anywhere near "pencil thin." My pretzels were smaller than what they have in the picture, and I'm sure this is why. However, they were still really good and REALLY filling. Also, I didn't have the right kind of salt, so I used cinnamon sugar, which was also fine. :)

I also didn't follow the directions about the parchment paper. I sprayed a pan really well, then just set them right on that after dipping them in the water mixture. And they still came off the pan just fine after cooking. Oh, and P.S., they really aren't all that great the next day, so do yourself a favor and just eat them all when you make them. ;) Trust me, after one bite, you'll want to.

Tuesday, July 06, 2010

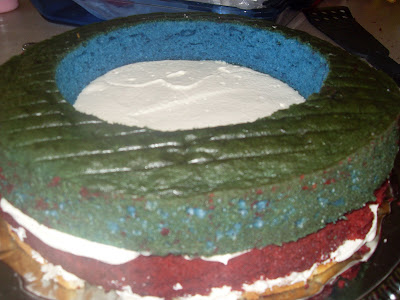
Birthday Cake Surprise!

Happy Birthday AMERICA!
Looks can be deceiving!
My Genius mom made the BEST B-day cake ever! I was going to log in as her to do this post in her name - but then I would sound boastful and conceited instead of proud and impressed!  She saw it on Studio 5 and instead of thinking "man those girls are crazy!" she thought "Hey! I think I can make that!" Now who's the crazy one?  The original cake was created by Elissa @ 17andbaking.com 
They both used 9" baking pans and now I see the wisdom in that but we wanted to feed a crowd so we went with an 11".  It made stacking the thin layers tricky and it sort of broke apart as we served it.  I think a smaller pan would have remedied both problems - but otherwise we really had a glitch free success!  

To the instructions already! 
3 separate bakings, 3 separate cakes! 
one red velvet, 
one white {dyed blue} 
and one more white (no egg yolks to keep it pure white!)    
The original also dyed the red layer from a white cake mix - we got the idea to use a red velvet mix from make it & love it

Slice the red and white layers horizontally into 2 pieces
White layer down first - FROST
Red layer down - FROST
Set aside
Layer without frosting the remaining red layer, white layer and uncut blue layer 
Center a cylindrical object on top - we used a cereal bowl, and cut straight down through all 3 layers!

Place the blue ring on top of your frosted layers
frost the inside of your blue ring and then place in your red and white circles
Frost to finish!
we kept it simple to up the 'WOW' factor!
Cut dramatically, make sure all eyes are on you!
voila!
If my instructions were confusing check out this studio 5 video:
Happy Birthday AMERICA

Wednesday, May 05, 2010

The Slotted Spoon

Doing what I can't... 

...and I love her for it!


My new food blog hero! Thanks for the tip Tina...


My first recipe to try : Costa Vida Sweet Pork!

Tuesday, March 16, 2010

Hawaiian Haystacks

This is one of those make up as you go, add what you have, type of meals, made entirely out of staple foods!
For the chicken and gravy base I just cooked chicken in my crock-pot on low with a little water, veggies and seasonings.  6 hours later I drained & rinsed the chicken and put it back in the crock-pot with cream of chicken soup (or cream of mushroom or both!!) thinned with some chicken stock.
Used my rice cooker to make about 3 cups white rice 
then prepared my toppings...

crunchy chow mein noodles
shredded cheddar cheese
toasted coconut
toasted almonds
green onions
raisens
celery
Pineapple
Mandarin oranges

anything tropical really or with and interesting texture (crunchy, chewy etc!)

Just pile it all on there - they go together surprisingly well
for little kids I make individual piles, they seem to take to it a bit better if it is all separated, maybe so they can eat all of the cheese and oranges and no celery idk!

Tuesday, March 09, 2010

Chocolate mayo cake-just try it!

Ok, I promise not to do anymore posts for a while to give everyone else a turn. :) Sorry! This is yet another hand-me-down, but from my other grandma who grew up in Germany during WWII. It is the most moist and delicious cake you will ever eat....well, that's homemade. And I absolutely PROMISE it tastes NOTHING like mayonnaise! I tried it out on my in-laws, and you don't do anything to upset in-laws. :) (They loved it, by the way.) So, just try it.

Chocolate Mayo Cake

1 C warm water
3 1/2 Tbsp. cocoa
1 1/4 C sugar
1/2 tsp. salt
2 C flour
2 tsp. soda
1 C mayo
1 tsp. vanilla

Mix everything together in one bowl.

Pour into greased pan(s). (Random note: I always coat the pans with butter (or tons of spray), then sprinkle some flour over that. This way, the cakes just slide right out of the pans.)
For two layers bake at 350 for 30 - 35 minutes.
For one layer? (We don't bake one layer cakes at my house, so I have no idea how long to cook one layer...just keep checking it and don't let it burn.) :)

Frost with cool whip, frosting, or cream cheese frosting. (also, at this point, you will probably lose your camera that you gave to your two year old to take pictures with, so revert to using your camera phone...)
(you can just buy the cream cheese frosting from the store, but I've never tried it and this kind is superb)

Cream Cheese Frosting

8 oz. cream cheese, softened. (HAS to be Philadelphia brand-spend the extra 20 cents-trust me)
2 Tbsp. butter, softened (margarine is fine)
2 tsp. vanilla
4 C powdered sugar

Mix all ingredients together except the powdered sugar.
When mixed well, slowly add the powdered sugar.
If too thick, add a few drops of milk.
If too thin, add more powdered sugar.

TA-DA! Enjoy!!!

Sunday, March 07, 2010

Grandma's Rolls

At my family's Thanksgiving and Christmas get together's, you will want to eat a minimum of 10 rolls. They are DELISH! I realized the other day that I am a big girl now and can make the rolls whenever I want.....except that I need the recipe. I called my grandma and asked for the coveted recipe, so now I am going to share with you! Your welcome. :)

Easy Grandma's Rolls

1 pkg yeast (or 1 tbsp)
1/4 C shortening (NOT butter or margarine!!)
1 tsp salt
1 C milk
1/4 C sugar
3 1/2 C flour
1 egg, well beaten

Soften yeast in 1/4 C warm water. (I wasn't sure how to "soften" yeast, so I just dissolved it like I normally would do for bread.) Put shortening, sugar and salt into a large bowl. Scald milk, pour over shortening, sugar and salt and stir until shortening is melted. Cool until lukewarm. Add 2 C flour and beat 1 minute at medium speed; add softened yeast and the beaten egg. Beat batter smooth at medium speed for 1/2 minute. With a WOODEN spoon, stir in 1 1/2 C more flour and beat batter for 2 minutes until smooth.
Cover and let rise until double (about one hour).

Then stir down and beat thoroughly with a wooden spoon. Let rise again until double in bulk (about 30 minutes). Stir down and shape into rolls of your choice.
(In my family, it's a tradition do always do these kind-with the three sides to make it easy to pull apart.)

But, just know, if you are going to do these this way (which I totally recommend), make SURE you have extra Crisco ready. It will help tons when rolling the dough into balls.

Place on sheet (or in muffin tins) and let rise again until they are the size that you want.

Bake at 400 degrees for about 10 minutes (ovens do vary, so watch carefully). When they start to brown on top, they will be done all the way through.

I know that you are asking why these are so special since they are so super easy (like everything I make...), but seriously...you HAVE to try them at least once. You'll never be satisfied with store-bought rolls again. :) Enjoy!!

LinkWithin

Related Posts with Thumbnails